 dev
devThis is a writeup of a project I did in April but never released. Well, I’ve definitely released it now, if you want to give it a try!
Instead of a real introduction, here’s a video demo, with camcorder LP technology from 2005:
I am not going to buy a capture card
Ever since Wild World, Animal Crossing has had a pattern system, where players can design their own textures and use them as clothes or decoration. New Horizons has one, but since it doesn’t have a stylus you have to either use the directional pad to mark individual pixels or draw with your fingertip.
I thought it would be fun to find a way to automate that. Now, granted, it takes a while, but it’s still much faster than trying to copy pixels over by hand.
The USB bit
Using work done by shinyquagsire23’s Switch Flightstick project, you can use a Teensy board to simulate a controller and send commands programatically.
The Teensy only has a tiny amount of memory, though, so any program program has to be pretty small. This rules out, say, loading a 32x32 png file and some commands to the board; you need to generate a compressed instruction set on a computer and compile that.
The engine I wrote for the Teensy is fairly simple: I define a series of steps in a large array, and then iterate through that:
1 2 3 4 5 6 7 8 9 10 11 12 13 | |
(It also appends some boilerplate for setting up the controller, like pressing the triggers together.)
My code treats each group of 3 uint8s as a logical frame, and sends one frame every 12 cycles. This times to just about 30 fps.
The logical frame itself is extremely compressed: I never need to touch the analog stick, just the buttons and the hat. The first number is the data set for the hat, the second number is the data sent for the buttons, and the last number is the number of times that frame is repeated. Button data and hat data here are, of course, bitmasks, using the descriptors in types.h.
When the Teensy is flashed and plugged in to the Switch via USB, it starts pressing buttons, until it has pressed all the buttons, and then it stops.
That’s enough for the Teensy to run simple programs, so long as I can write and compile them.
Generating the program
So, with that working, you still need to do all the logical work of figuring out what buttons to press, and in what order.
First, a breakdown of how patterns actually work:
The canvas1 is 32x32, and you can draw on it with a number of simple, MSPaint style tools. For this project, I use the pencil and the global fill tool, along with the “mirror” option. There are likely more optimizations you could do by using more tools, but I haven’t done that yet.
In the New Horizons pattern designer, you can define your own color palette. You get 15 color slots to work with, and each color is defined by hue, saturation, and value. There are 30 hue increments, and 15 increments each for saturation and value.
Now, the first thing you need to do, strictly speaking, is generate a 32x32 image file with only 15 unique colors. I don’t automate that, I just use Paint.NET. Then you open that file with makesteps.py, which is where all the logic for the program lives.
The general system for generating the instruction set is thus:
- Load an image
- Create a virtual 32x32 canvas and set it to the defaults the game uses
- Generate a game-ready palette
- Incrementally edit the virtual canvas using the tools available in the game, recording each step
- Convert that series of steps to button presses
- Flash the Teensy and let it run
1. Load an image
When I load the image, I validate it. It needs to be 32x32, it needs to have a palette of 15 colors or fewer, etc.
2. Create a virtual canvas
In order to make sure I draw the image correctly — and so it’s easy to check for errors — I make a virtual canvas and simulate the entire drawing process.
The actual virtual canvas is a simple python object:
1 2 3 4 5 6 7 8 | |
Here, the pixel values are stored in self.canvas, which is just a two-dimentional list initialized to all Nones. The ACCanvas class is also where I store helper functions that work on the canvas array, like genPalette to determine what colors are on the canvas, or toImage to create a PIL.Image version I can save as a png.
This is especially nice because it lets me export the finished image locally. Because of the color limitations of the game, the colors in the original image will be clamped somewhat, and the virtual canvas lets me test what that looks like.
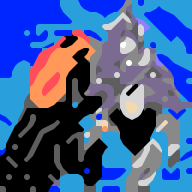
ACNH also uses the 6xBRZ scaling algorithm for displaying patterns in-game. 6xBRZ is a pixel-scaling algorithm, so instead of pixel art, the final pattern is made of curves and triangles. The pixels are replaced with lines and shapes that are meant to better represent the meaning of the shape.
Here is an example, where the input file is pixel art of a horse fighting a football player:

3. Generate a game-ready palette
Now I take all the colors in the input image and put together a palette that can be used in the game.
The first and most obvious step is converting the colors: as mentioned before, ACNH has 30 possible hues and 15 possible saturations and values, whereas the input image has 256 possible states for each. The first order of business, then, is reducing the bits on these.
Here’s what that looks like:
1 2 3 4 5 6 7 8 9 10 11 12 13 14 15 16 17 18 19 20 21 22 23 24 25 26 27 | |
This gives us a nice hsv tuple with the game’s drastically reduced domain.
(The steps for this, by the way, are hideous: hundreds of individual ticks to configure the sliders exactly right for each color.)
This isn’t good yet, though, because there are a number of compression steps to do:
- Set all colors with V=0 to the same hue (they’re white/grey/black)
- Set all colors with S=0 to the same hue and vividness (they’re black)
Otherwise, we might waste multiple color slots on identical colors.
In the future, it might be possible to some sort of optimization by putting colors that frequently appear adjacent to each other in the image closer together on the palette, to reduce the number of color swaps.
4. Incrementally edit the virtual canvas
This is, by far, the most complicated part of the program, because we don’t just have to mark each pixel correctly, we need to do it efficiently. Otherwise it’ll take a very long time to run, or else it might not fit on the Teensy at all.
All our drawing methods are stored in a class called Printer; every actual printer is a class that inheirits from this. It has functions like moveTo to move the cursor to a pixel, setColor to change the selected color, setTool to set the selected tool, etc. More on the printer implementation in section 5.
The very simplest implementation of this is NaivePrinter, which simply visits every pixel on the canvas and marks it:
1 2 3 4 5 6 7 8 | |
This isn’t quite as bad as it sounds, because smartTraverse tries to be somewhat sensible in how it traverses the canvas: by default it snakes around, so as to traverse the full canvas in one continuous line without wasting time by covering any spots it already visited: (4x4 canvas to demonstrate):
1 2 3 4 | |
Now, I’ll be honest with you, I’m lousy2 with algorithms. Algorithms are obtuse, horrible little things that should be buried away in functions and never looked directly at. So, instead of doing any incredibly robust analysis of the source image to determine what method would correctly print the full image in the fewest number of steps, I just try a lot of different methods and check afterwards to see which one is fastest. Because each step takes a logical frame, it’s easy to quickly time this.
In addition to the NaivePrinter shown above, here are some other methodologies I use:
ScreenPrinter prints one color at a time:
1 2 3 4 5 6 7 8 9 10 | |
This can save a significant amount of time depending on the source image, as changing color midway through the image can be expensive.
SpiralPrinter starts in the middle of the canvas (where your cursor defaults to) and traverses the canvas in a spiral outward.
There are also other settings I permute through, like smartTraversing vertically instead of horizontally, or setting the game’s “Mirror” mode to print two spaces at once, or using the “Fill All” tool at the beginning of the print.
5. Convert that series of steps to button presses
Each of these functions that edits the virtual canvas also yields a list of steps. In the python script, steps are stored as enums that represent button presses, with their values being (button, hat) tuples, as such:
1 2 3 4 5 6 7 8 9 | |
As I edit the canvas, I collect those movements into a list, and at the end of the process I serialize that list to the teensy steps format, as described earlier.
1 2 3 4 5 6 7 8 9 10 11 | |
Except I don’t just do that, because that would be extremely slow. If you did every step sequentially, you would end up wasting a ton of time, because there are a lot of steps that can run in parallel. By the time you actually press the A button and write the pixel, everything needs to be set properly. However, before then, multiple steps can be folded together.
Take, as an example, needing to mark a pixel that is 4 pixels away and 5 colors away. Moving the cursor uses the hat only, and changing the color uses the trigger buttons.
Instead of doing
- Right x4 (move cursor)
- LR x5 (change color)
- A x1 (mark pixel)
sequentially, you can collapse the steps into
- Right + LR x4 (move cursor & hange color)
- LR x1 (change color)
- A x1 (mark pixel)
See how this dramatically improves performance:
gantt
    axisFormat %S
    section Sequential
    Set color       :a1, 0, 5s
    Move cursor     :a2, after a1, 4s
    Mark spot       :a3, after a1 a2, 1s

    section Parallel
    Set color       :b1, 0, 5s
    Move cursor     :b2, 0, 4s
    Mark spot       :b3, after b1 b2, 1s
This algorithm actually implements step folding:
1 2 3 4 5 6 7 8 9 10 11 12 13 14 15 16 17 18 19 20 21 22 23 24 25 26 | |
In addition to this postprocessing, there’s additional compression and optimization throughout the step generation process. Printer.moveCursorTo(x, y) uses zip to group steps together and use diagonal hat movement when possible. Setting commands like setMirrored and setTool use state to keep track of the setting, and don’t require a step if the option is already set correctly.
6. Flash the Teensy and let it run
And I’m done! Just plug the teensy into the switch at the right moment and it will print the pattern autonomously.
That’s, uh, all I’ve got, really. If you’ve got a Teensy or $20 and want to print your own patterns, or you just want to take a closer look at how this was done, you’re welcome to grab the code.
Technical Demo
The program itself runs something like this:
1 2 3 4 5 6 7 8 9 10 11 12 13 14 15 16 17 18 19 20 | |
And, running it: (this is the configuration used in the demo video, with SpiralPrinter temporarily disabled)
1 2 3 4 5 6 7 8 9 10 11 12 13 14 15 16 17 18 19 20 21 22 23 24 25 26 27 28 29 30 31 32 33 34 35 36 37 38 39 40 41 42 43 44 45 46 47 48 49 50 51 52 53 54 55 56 57 58 59 60 61 62 63 64 65 66 67 68 69 70 71 72 73 74 75 76 77 78 79 80 81 82 83 | |
(the bitmasks in parenthesis are permutations of settings)
And the generated steps.c file, for those curious:
1 2 3 4 5 6 7 8 9 10 11 12 13 14 15 16 17 18 19 20 21 22 23 24 25 26 27 28 29 30 31 32 33 34 35 36 37 38 39 40 41 42 43 44 45 46 47 48 49 50 51 52 53 54 55 56 57 58 59 60 61 62 63 64 65 66 67 68 69 70 71 72 73 74 75 76 77 78 79 80 81 82 83 84 85 86 87 88 89 90 91 92 93 94 95 96 97 98 99 100 101 102 103 104 105 106 107 108 109 110 111 112 113 114 115 116 117 118 119 120 121 122 123 124 125 126 127 128 129 130 131 132 133 134 135 136 137 138 139 140 141 142 143 144 145 146 147 148 149 150 151 152 153 154 155 156 157 158 159 160 161 162 163 164 165 166 167 168 169 170 171 172 173 174 175 176 177 178 179 180 181 182 183 184 185 186 187 188 189 190 191 192 193 194 195 196 197 198 199 200 201 202 203 204 205 206 207 208 209 210 211 212 213 214 215 216 217 218 219 220 221 222 223 224 225 226 227 228 229 230 231 232 233 234 235 236 237 238 239 240 241 242 243 244 245 246 247 248 249 250 251 252 253 254 255 256 257 258 259 260 261 262 263 264 265 266 267 268 269 270 271 272 273 274 275 276 277 278 279 280 281 282 283 284 285 286 287 288 289 290 291 292 293 294 295 296 297 298 299 300 301 302 303 304 305 306 307 308 309 310 311 312 313 314 315 316 317 318 319 320 321 322 323 324 325 326 327 328 329 330 331 332 333 334 335 336 337 338 339 340 341 342 343 344 345 346 347 348 349 350 351 352 353 354 355 356 357 358 359 360 361 362 363 364 365 366 367 368 369 370 371 372 373 374 375 376 377 378 379 380 381 382 383 384 385 386 387 388 389 390 391 392 393 394 395 396 397 398 399 400 401 402 403 404 405 406 407 408 409 410 411 412 413 414 415 416 417 418 419 420 421 422 423 424 425 426 427 428 429 430 431 432 433 434 435 436 437 438 439 440 441 442 443 444 445 446 447 448 449 450 451 452 453 454 455 456 457 458 459 460 461 462 463 464 465 466 467 468 469 470 471 472 473 474 475 476 477 478 479 480 | |